OpenDaylight Group Based Policy allows users to express network configuration in a declarative versus imperative way.
This is often described as asking for “what you want”, rather than “how to do it”.
In order to achieve this Group Based Policy (herein referred to as GBP) is an implementation of an Intent System.
An Intent System:
To this end, GBP Policy views an Intent System visually as:
In summary GBP is about the Automation of Intent.
By thinking of Intent Systems in this way, it enables:
automation of intent
By focusing on Model. Process. Automation, a consistent policy resolution process enables for mapping between the expressed intent and renderers responsible for providing the capabilities of implementing that intent.
recursive/intent level-independent behaviour.
Where one person’s concrete is another’s abstract, intent can be fulfilled through a hierarchical implementation of non-domain specific policy resolution. Domain specifics are provided by the renderers, and exposed via the API, at each policy resolution instance. For example:
Note
This is a very domain specific analogy, tied to something most readers will understand. It in no way implies the **GBP* should be implemented in an OSI type fashion. The premise is that by implementing a full Intent System, the user is freed from a lot of the constraints of how the expressed intent is realised.*
It is important to show the overall philosophy of GBP as it sets the project’s direction.
In this release of OpenDaylight, GBP focused on expressed intent, refactoring of how renderers consume and publish Subject Feature Definitions for multi-renderer support.
In order to explain the fundamental value proposition of GBP, an illustrated example is given. In order to do that some terminology must be defined.
The Access Model is the core of the GBP Intent System policy resolution process.
Endpoints:
Define concrete uniquely identifiable entities. In this release, examples could be a Docker container, or a Neutron port
EndpointGroups:
EndpointGroups are sets of endpoints that share a common set of policies. EndpointGroups can participate in contracts that determine the kinds of communication that are allowed. EndpointGroups consume and provide contracts. They also expose both requirements and capabilities, which are labels that help to determine how contracts will be applied. An EndpointGroup can specify a parent EndpointGroup from which it inherits.
Contracts:
Contracts determine which endpoints can communicate and in what way. Contracts between pairs of EndpointGroups are selected by the contract selectors defined by the EndpointGroup. Contracts expose qualities, which are labels that can help EndpointGroups to select contracts. Once the contract is selected, contracts have clauses that can match against requirements and capabilities exposed by EndpointGroups, as well as any conditions that may be set on endpoints, in order to activate subjects that can allow specific kinds of communication. A contract is allowed to specify a parent contract from which it inherits.
Subject
Subjects describe some aspect of how two endpoints are allowed to communicate. Subjects define an ordered list of rules that will match against the traffic and perform any necessary actions on that traffic. No communication is allowed unless a subject allows that communication.
Clause
Clauses are defined as part of a contract. Clauses determine how a contract should be applied to particular endpoints and EndpointGroups. Clauses can match against requirements and capabilities exposed by EndpointGroups, as well as any conditions that may be set on endpoints. Matching clauses define some set of subjects which can be applied to the communication between the pairs of endpoints.
GBP offers an intent based interface, accessed via the UX, via the REST API or directly from a domain-specific-language such as Neutron through a mapping interface.
There are two models in GBP:
The classifier and action portions of the model can be thought of as hooks, with their definition provided by each renderer about its domain specific capabilities. In GBP for this release, there is one renderer, the OpenFlow Overlay renderer (OfOverlay).
These hooks are filled with definitions of the types of features the renderer can provide the subject, and are called subject-feature-definitions.
This means an expressed intent can be fulfilled by, and across, multiple renderers simultaneously, without any specific provisioning from the consumer of GBP.
Since GBP is implemented in OpenDaylight, which is an SDN controller, it also must address networking. This is done via the forwarding model, which is domain specific to networking, but could be applied to many different types of networking.
Each endpoint is provisioned with a network-containment. This can be a:
A simple example of how the access and forwarding models work is as follows:
In this example, the EPG:webservers is providing the web and ssh contracts. The EPG:client is consuming those contracts. EPG:client is providing the any contract, which is consumed by EPG:webservers.
The direction keyword is always from the perspective of the provider of the contract. In this case contract web, being provided by EPG:webservers, with the classifier to match TCP destination port 80, means:
When the forwarding model is considered in the figure above, it can be seen that even though all endpoints are communicating using a common set of contracts, their forwarding is contained by the forwarding model contexts or namespaces. In the example shown, the endpoints associated with a network-containment that has an ultimate parent of L3Context:Sales can only communicate with other endpoints within this L3Context. In this way L3VPN services can be implemented without any impact to the Intent of the contract.
The overall architecture, including Neutron domain specific mapping, and the OpenFlow Overlay renderer looks as so:
The major benefit of this architecture is that the mapping of the domain-specific-language is completely separate and independent of the underlying renderer implementation.
For instance, using the Neutron Mapper, which maps the Neutron API to the GBP core model, any contract automatically generated from this mapping can be augmented via the UX to use Service Function Chaining, a capability not currently available in OpenStack Neutron.
When another renderer is added, for instance, NetConf, the same policy can now be leveraged across NetConf devices simultaneously:
As other domain-specific mappings occur, they too can leverage the same renderers, as the renderers only need to implement the GBP access and forwarding models, and the domain-specific mapping need only manage mapping to the access and forwarding models. For instance:
In summary, the GBP architecture:
The first step in policy resolution is to select the contracts that are in scope.
EndpointGroups participate in contracts either as a provider or as a consumer of a contract. Each EndpointGroup can participate in many contracts at the same time, but for each contract it can be in only one role at a time. In addition, there are two ways for an EndpointGroup to select a contract: either with either a:
named selector
Named selectors simply select a specific contract by its contract ID.
target selector.
Target selectors allow for additional flexibility by matching against qualities of the contract’s target.
Thus, there are a total of 4 kinds of contract selector:
provider named selector
Select a contract by contract ID, and participate as a provider.
provider target selector
Match against a contract’s target with a quality matcher, and participate as a provider.
consumer named selector
Select a contract by contract ID, and participate as a consumer.
consumer target selector
Match against a contract’s target with a quality matcher, and participate as a consumer.
To determine which contracts are in scope, contracts are found where either the source EndpointGroup selects a contract as either a provider or consumer, while the destination EndpointGroup matches against the same contract in the corresponding role. So if endpoint x in EndpointGroup X is communicating with endpoint y in EndpointGroup Y, a contract C is in scope if either X selects C as a provider and Y selects C as a consumer, or vice versa.
The details of how quality matchers work are described further in Matchers. Quality matchers provide a flexible mechanism for contract selection based on labels.
The end result of the contract selection phase can be thought of as a set of tuples representing selected contract scopes. The fields of the tuple are:
The result is then stored in the datastore under Resolved Policy.
The second phase in policy resolution is to determine which subjects are in scope. The subjects define what kinds of communication are allowed between endpoints in the EndpointGroups. For each of the selected contract scopes from the contract selection phase, the subject selection procedure is applied.
Labels called, capabilities, requirements and conditions are matched against to bring a Subject into scope. EndpointGroups have capabilities and requirements, while endpoints have conditions.
When acting as a provider, EndpointGroups expose capabilities, which are labels representing specific pieces of functionality that can be exposed to other EndpointGroups that may meet functional requirements of those EndpointGroups.
When acting as a consumer, EndpointGroups expose requirements, which are labels that represent that the EndpointGroup requires some specific piece of functionality.
As an example, we might create a capability called “user-database” which indicates that an EndpointGroup contains endpoints that implement a database of users.
We might create a requirement also called “user-database” to indicate an EndpointGroup contains endpoints that will need to communicate with the endpoints that expose this service.
Note that in this example the requirement and capability have the same name, but the user need not follow this convention.
The matching provider selector (that was used by the provider EndpointGroup to select the contract) is examined to determine the capabilities exposed by the provider EndpointGroup for this contract scope.
The provider selector will have a list of capabilities either directly included in the provider selector or inherited from a parent selector or parent EndpointGroup. (See Inheritance).
Similarly, the matching consumer selector will expose a set of requirements.
Endpoints can have conditions, which are labels representing some relevant piece of operational state related to the endpoint.
An example of a condition might be “malware-detected,” or “authentication-succeeded.” Conditions are used to affect how that particular endpoint can communicate.
To continue with our example, the “malware-detected” condition might cause an endpoint’s connectivity to be cut off, while “authentication-succeeded” might open up communication with services that require an endpoint to be first authenticated and then forward its authentication credentials.
Clauses perform the actual selection of subjects. A clause has lists of matchers in two categories. In order for a clause to become active, all lists of matchers must match. A matching clause will select all the subjects referenced by the clause. Note that an empty list of matchers counts as a match.
The first category is the consumer matchers, which match against the consumer EndpointGroup and endpoints. The consumer matchers are:
Group Idenfication Constraint: Requirement matchers
Matches against requirements in the matching consumer selector.
Group Identification Constraint: GroupName
Matches against the group name
Consumer condition matchers
Matches against conditions on endpoints in the consumer EndpointGroup
Consumer Endpoint Identification Constraint
Label based criteria for matching against endpoints. In this release this can be used to label endpoints based on IpPrefix.
The second category is the provider matchers, which match against the provider EndpointGroup and endpoints. The provider matchers are:
Group Idenfication Constraint: Capability matchers
Matches against capabilities in the matching provider selector.
Group Identification Constraint: GroupName
Matches against the group name
Consumer condition matchers
Matches against conditions on endpoints in the provider EndpointGroup
Consumer Endpoint Identification Constraint
Label based criteria for matching against endpoints. In this release this can be used to label endpoints based on IpPrefix.
Clauses have a list of subjects that apply when all the matchers in the clause match. The output of the subject selection phase logically is a set of subjects that are in scope for any particular pair of endpoints.
Now subjects have been selected that apply to the traffic between a particular set of endpoints, policy can be applied to allow endpoints to communicate. The applicable subjects from the previous step will each contain a set of rules.
Rules consist of a set of classifiers and a set of actions. Classifiers match against traffic between two endpoints. An example of a classifier would be something that matches against all TCP traffic on port 80, or one that matches against HTTP traffic containing a particular cookie. Actions are specific actions that need to be taken on the traffic before it reaches its destination. Actions could include tagging or encapsulating the traffic in some way, redirecting the traffic, or applying a service function chain.
Rules, subjects, and actions have an order parameter, where a lower order value means that a particular item will be applied first. All rules from a particular subject will be applied before the rules of any other subject, and all actions from a particular rule will be applied before the actions from another rule. If more than item has the same order parameter, ties are broken with a lexicographic ordering of their names, with earlier names having logically lower order.
Matchers specify a set of labels (which include requirements, capabilities, conditions, and qualities) to match against. There are several kinds of matchers that operate similarly:
Quality matchers
used in target selectors during the contract selection phase. Quality matchers provide a more advanced and flexible way to select contracts compared to a named selector.
Requirement and capability matchers
used in clauses during the subject selection phase to match against requirements and capabilities on EndpointGroups
Condition matchers
used in clauses during the subject selection phase to match against conditions on endpoints
A matcher is, at its heart, fairly simple. It will contain a list of label names, along with a match type. The match type can be either:
“all”
which means the matcher matches when all of its labels match
“any”
which means the matcher matches when any of its labels match,
“none”
which means the matcher matches when none of its labels match.
Note a match all matcher can be made by matching against an empty set of labels with a match type of “all.”
Additionally each label to match can optionally include a relevant name field. For quality matchers, this is a target name. For capability and requirement matchers, this is a selector name. If the name field is specified, then the matcher will only match against targets or selectors with that name, rather than any targets or selectors.
Some objects in the system include references to parents, from which they will inherit definitions. The graph of parent references must be loop free. When resolving names, the resolution system must detect loops and raise an exception. Objects that are part of these loops may be considered as though they are not defined at all. Generally, inheritance works by simply importing the objects in the parent into the child object. When there are objects with the same name in the child object, then the child object will override the parent object according to rules which are specific to the type of object. We’ll next explore the detailed rules for inheritance for each type of object
EndpointGroups
EndpointGroups will inherit all their selectors from their parent EndpointGroups. Selectors with the same names as selectors in the parent EndpointGroups will inherit their behavior as defined below.
Selectors
Selectors include provider named selectors, provider target selectors, consumer named selectors, and consumer target selectors. Selectors cannot themselves have parent selectors, but when selectors have the same name as a selector of the same type in the parent EndpointGroup, then they will inherit from and override the behavior of the selector in the parent EndpointGroup.
Named Selectors
Named selectors will add to the set of contract IDs that are selected by the parent named selector.
Target Selectors
A target selector in the child EndpointGroup with the same name as a target selector in the parent EndpointGroup will inherit quality matchers from the parent. If a quality matcher in the child has the same name as a quality matcher in the parent, then it will inherit as described below under Matchers.
Contracts
Contracts will inherit all their targets, clauses and subjects from their parent contracts. When any of these objects have the same name as in the parent contract, then the behavior will be as defined below.
Targets
Targets cannot themselves have a parent target, but it may inherit from targets with the same name as the target in a parent contract. Qualities in the target will be inherited from the parent. If a quality with the same name is defined in the child, then this does not have any semantic effect except if the quality has its inclusion-rule parameter set to “exclude.” In this case, then the label should be ignored for the purpose of matching against this target.
Subjects
Subjects cannot themselves have a parent subject, but it may inherit from a subject with the same name as the subject in a parent contract. The order parameter in the child subject, if present, will override the order parameter in the parent subject. The rules in the parent subject will be added to the rules in the child subject. However, the rules will not override rules of the same name. Instead, all rules in the parent subject will be considered to run with a higher order than all rules in the child; that is all rules in the child will run before any rules in the parent. This has the effect of overriding any rules in the parent without the potentially-problematic semantics of merging the ordering.
Clauses
Clauses cannot themselves have a parent clause, but it may inherit from a clause with the same name as the clause in a parent contract. The list of subject references in the parent clause will be added to the list of subject references in the child clause. This is just a union operation. A subject reference that refers to a subject name in the parent contract might have that name overridden in the child contract. Each of the matchers in the clause are also inherited by the child clause. Matchers in the child of the same name and type as a matcher from the parent will inherit from and override the parent matcher. See below under Matchers for more information.
Matchers
Matchers include quality matchers, condition matchers, requirement matchers, and capability matchers. Matchers cannot themselves have parent matchers, but when there is a matcher of the same name and type in the parent object, then the matcher in the child object will inherit and override the behavior of the matcher in the parent object. The match type, if specified in the child, overrides the value specified in the parent. Labels are also inherited from the parent object. If there is a label with the same name in the child object, this does not have any semantic effect except if the label has its inclusion-rule parameter set to “exclude.” In this case, then the label should be ignored for the purpose of matching. Otherwise, the label with the same name will completely override the label from the parent.
These following components make up this application and are described in more detail in following sections:
The GBP UX is access via:
http://<odl controller>:8181/index.html
Basic view contains 5 navigation buttons which switch user to the desired section of application:
Governance view consists from three columns.
Governance view – Basic view – Left column
In the left column is Health section with Exception and Conflict buttons with no functionality yet. This is a placeholder for development in further releases.
Governance view – Basic view – Middle column
In the top half of this section is select box with list of tenants for select. Once the tenant is selected, all sub sections in application operate and display data with actual selected tenant.
Below the select box are buttons which display Expressed or Delivered policy of Governance section. In the bottom half of this section is select box with list of renderers for select. There is currently only OfOverlay renderer available.
Below the select box is Renderer configuration button, which switch the app into the Policy expression view with Renderers section expanded for performing CRUD operations. Renderer state button display Renderer state view.
Governance view – Basic view – Right column
In the bottom part of the right section of Governance view is Home button which switch the app to the Basic view.
In the top part is situated navigation menu with four main sections.
Policy expression button expand/collapse sub menu with three main parts of Policy expression. By clicking on sub menu buttons, user will be switched into the Policy expressions view with appropriate section expanded for performing CRUD operations.
Renderer configuration button switches user into the Policy expressions view.
Governance button expand/collapse sub menu with four main parts of Governance section. Sub menu buttons of Governance section display appropriate section of Governance view.
Operational constraints have no functionality yet, and is a placeholder for development in further releases.
Below the menu is place for view info section which displays info about actual selected element from the topology (explained below).
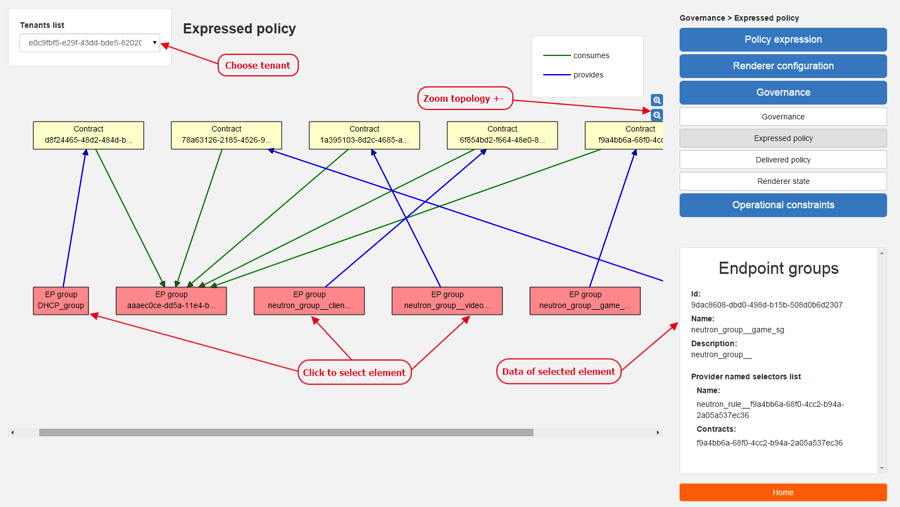
Governance view – Expressed policy
In this view are displayed contracts with their consumed and provided EndpointGroups of actual selected tenant, which can be changed in select box in the upper left corner.
By single-clicking on any contract or EPG, the data of actual selected element will be shown in the right column below the menu. A Manage button launches a display wizard window for managing configuration of items such as Service Function Chaining.
Governance view – Delivered policy In this view are displayed subjects with their consumed and provided EndpointGroups of actual selected tenant, which can be changed in select box in the upper left corner.
By single-clicking on any subject or EPG, the data of actual selected element will be shown in the right column below the menu.
By double-click on subject the subject detail view will be displayed with subject’s rules of actual selected subject, which can be changed in select box in the upper left corner.
By single-clicking on rule or subject, the data of actual selected element will be shown in the right column below the menu.
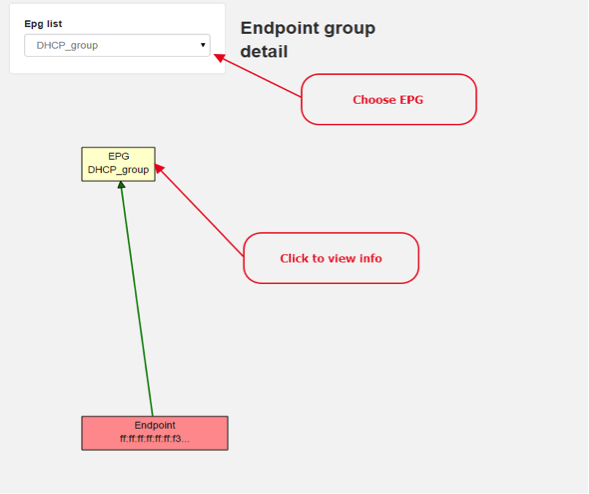
By double-clicking on EPG in Delivered policy view, the EPG detail view will be displayed with EPG’s endpoints of actual selected EPG, which can be changed in select box in the upper left corner.
By single-clicking on EPG or endpoint the data of actual selected element will be shown in the right column below the menu.
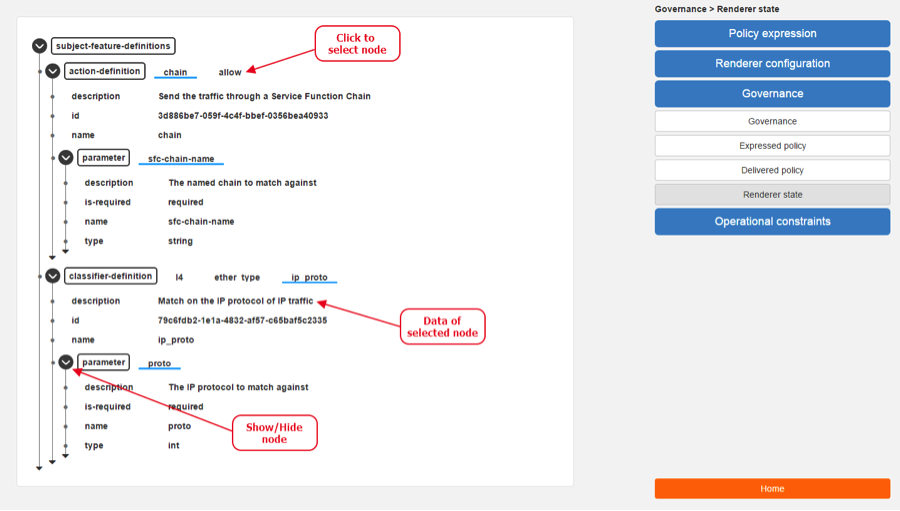
Governance view – Renderer state
In this part are displayed Subject feature definition data with two main parts: Action definition and Classifier definition.
By clicking on the down/right arrow in the circle is possible to expand/hide data of appropriate container or list. Next to the list node are displayed names of list’s elements where one is always selected and element’s data are shown (blue line under the name).
By clicking on names of children nodes is possible to select desired node and node’s data will be displayed.
In the left part of this view is placed topology of actual selected elements with the buttons for switching between types of topology at the bottom.
Right column of this view contains four parts. At the top of this column are displayed breadcrumbs with actual position in the application.
Below the breadcrumbs is select box with list of tenants for select. In the middle part is situated navigation menu, which allows switch to the desired section for performing CRUD operations.
At the bottom is quick navigation menu with Access Model Wizard button which display Wizard view, Home button which switch application to the Basic view and occasionally Back button, which switch application to the upper section.
Policy expression - Navigation menu
To open Policy expression, select Policy expression from the GBP Home screen.
In the top of navigation box you can select the tenant from the tenants list to activate features addicted to selected tenant.
In the right menu, by default, the Policy menu section is expanded. 
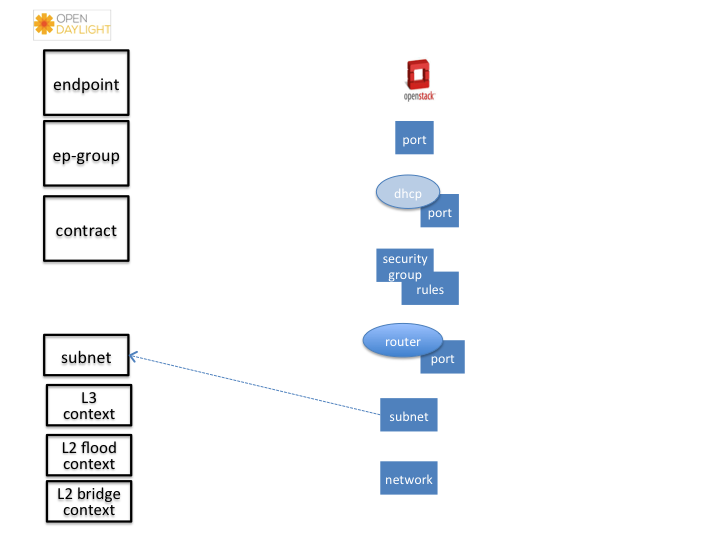
Subitems of this section are modules for CRUD (creating, reading, updating and deleting) of tenants, EndpointGroups, contracts, L2/L3 objects.
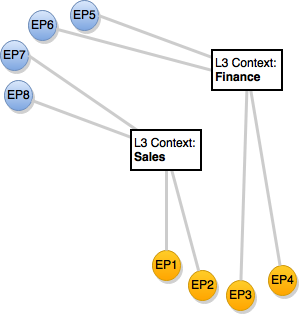
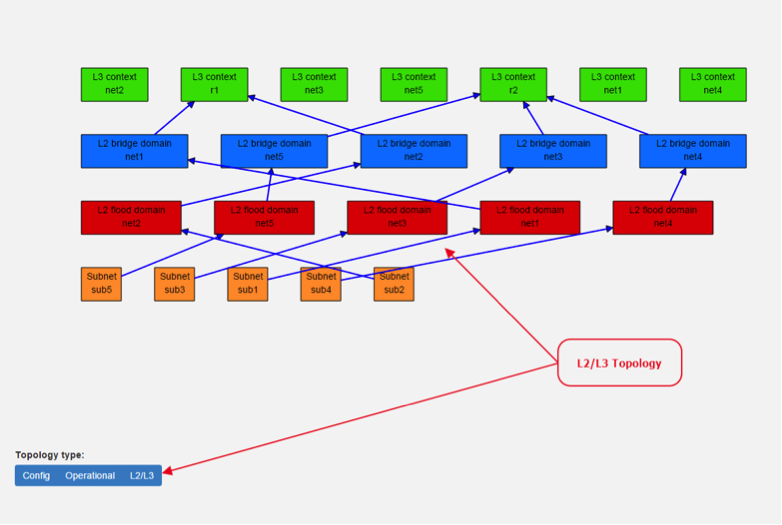
Policy expression - Types of topology
There are three different types of topology:
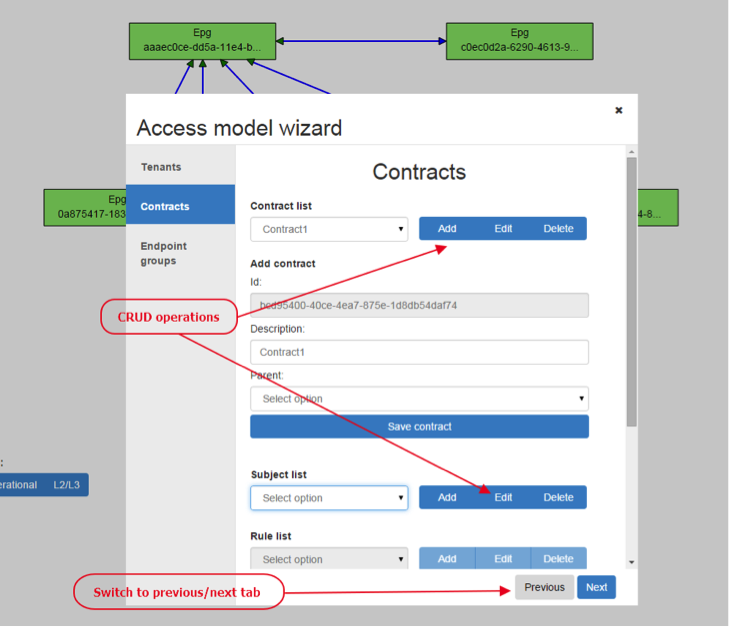
Policy expression - CRUD operations
In this part are described basic flows for viewing, adding, editing and deleting system elements like tenants, EndpointGroups etc.
To edit tenant objects click the Tenants button in the right menu. You can see the CRUD form containing tenants list and control buttons.
To add new tenant, click the Add button This will display the form for adding a new tenant. After filling tenant attributes Name and Description click Save button. Saving of any object can be performed only if all the object attributes are filled correctly. If some attribute doesn’t have correct value, exclamation mark with mouse-over tooltip will be displayed next to the label for the attribute. After saving of tenant the form will be closed and the tenants list will be set to default value.
To view an existing tenant, select the tenant from the select box Tenants list. The view form is read-only and can be closed by clicking cross mark in the top right of the form.
To edit selected tenant, click the Edit button, which will display the edit form for selected tenant. After editing the Name and Description of selected tenant click the Save button to save selected tenant. After saving of tenant the edit form will be closed and the tenants list will be set to default value.
To delete tenant select the tenant from the Tenants list and click Delete button.
To return to the Policy expression click Back button on the bottom of window.
EndpointGroups
For managing EndpointGroups (EPG) the tenant from the top Tenants list must be selected.
To add new EPG click Add button and after filling required attributes click Save button. After adding the EPG you can edit it and assign Consumer named selector or Provider named selector to it.
To edit EPG click the Edit button after selecting the EPG from Group list.
To add new Consumer named selector (CNS) click the Add button next to the Consumer named selectors list. While CNS editing you can set one or more contracts for current CNS pressing the Plus button and selecting the contract from the Contracts list. To remove the contract, click on the cross mark next to the contract. Added CNS can be viewed, edited or deleted by selecting from the Consumer named selectors list and clicking the Edit and Delete buttons like with the EPG or tenants.
To add new Provider named selector (PNS) click the Add button next to the Provider named selectors list. While PNS editing you can set one or more contracts for current PNS pressing the Plus button and selecting the contract from the Contracts list. To remove the contract, click on the cross mark next to the contract. Added PNS can be viewed, edited or deleted by selecting from the Provider named selectors list and clicking the Edit and Delete buttons like with the EPG or tenants.
To delete EPG, CNS or PNS select it in selectbox and click the Delete button next to the selectbox.
Contracts
For managing contracts the tenant from the top Tenants list must be selected.
To add new Contract click Add button and after filling required fields click Save button.
After adding the Contract user can edit it by selecting in the Contracts list and clicking Edit button.
To add new Clause click Add button next to the Clause list while editing the contract. While editing the Clause after selecting clause from the Clause list user can assign clause subjects by clicking the Plus button next to the Clause subjects label. Adding and editing action must be submitted by pressing Save button. To manage Subjects you can use CRUD form like with the Clause list.
L2/L3
For managing L2/L3 the tenant from the top Tenants list must be selected.
To add L3 Context click the Add button next to the L3 Context list ,which will display the form for adding a new L3 Context. After filling L3 Context attributes click Save button. After saving of L3 Context, form will be closed and the L3 Context list will be set to default value.
To view an existing L3 Context, select the L3 Context from the select box L3 Context list. The view form is read-only and can be closed by clicking cross mark in the top right of the form.
If user wants to edit selected L3 Context, click the Edit button, which will display the edit form for selected L3 Context. After editing click the Save button to save selected L3 Context. After saving of L3 Context, the edit form will be closed and the L3 Context list will be set to default value.
To delete L3 Context, select it from the L3 Context list and click Delete button.
To add L2 Bridge Domain, click the Add button next to the L2 Bridge Domain list. This will display the form for adding a new L2 Bridge Domain. After filling L2 Bridge Domain attributes click Save button. After saving of L2 Bridge Domain, form will be closed and the L2 Bridge Domain list will be set to default value.
To view an existing L2 Bridge Domain, select the L2 Bridge Domain from the select box L2 Bridge Domain list. The view form is read-only and can be closed by clicking cross mark in the top right of the form.
If user wants to edit selected L2 Bridge Domain, click the Edit button, which will display the edit form for selected L2 Bridge Domain. After editing click the Save button to save selected L2 Bridge Domain. After saving of L2 Bridge Domain the edit form will be closed and the L2 Bridge Domain list will be set to default value.
To delete L2 Bridge Domain select it from the L2 Bridge Domain list and click Delete button.
To add L3 Flood Domain, click the Add button next to the L3 Flood Domain list. This will display the form for adding a new L3 Flood Domain. After filling L3 Flood Domain attributes click Save button. After saving of L3 Flood Domain, form will be closed and the L3 Flood Domain list will be set to default value.
To view an existing L3 Flood Domain, select the L3 Flood Domain from the select box L3 Flood Domain list. The view form is read-only and can be closed by clicking cross mark in the top right of the form.
If user wants to edit selected L3 Flood Domain, click the Edit button, which will display the edit form for selected L3 Flood Domain. After editing click the Save button to save selected L3 Flood Domain. After saving of L3 Flood Domain the edit form will be closed and the L3 Flood Domain list will be set to default value.
To delete L3 Flood Domain select it from the L3 Flood Domain list and click Delete button.
To add Subnet click the Add button next to the Subnet list. This will display the form for adding a new Subnet. After filling Subnet attributes click Save button. After saving of Subnet, form will be closed and the Subnet list will be set to default value.
To view an existing Subnet, select the Subnet from the select box Subnet list. The view form is read-only and can be closed by clicking cross mark in the top right of the form.
If user wants to edit selected Subnet, click the Edit button, which will display the edit form for selected Subnet. After editing click the Save button to save selected Subnet. After saving of Subnet the edit form will be closed and the Subnet list will be set to default value.
To delete Subnet select it from the Subnet list and click Delete button.
Classifiers
To add Classifier, click the Add button next to the Classifier list. This will display the form for adding a new Classifier. After filling Classifier attributes click Save button. After saving of Classifier, form will be closed and the Classifier list will be set to default value.
To view an existing Classifier, select the Classifier from the select box Classifier list. The view form is read-only and can be closed by clicking cross mark in the top right of the form.
If you want to edit selected Classifier, click the Edit button, which will display the edit form for selected Classifier. After editing click the Save button to save selected Classifier. After saving of Classifier the edit form will be closed and the Classifier list will be set to default value.
To delete Classifier select it from the Classifier list and click Delete button.
Actions
To add Action, click the Add button next to the Action list. This will display the form for adding a new Action. After filling Action attributes click Save button. After saving of Action, form will be closed and the Action list will be set to default value.
To view an existing Action, select the Action from the select box Action list. The view form is read-only and can be closed by clicking cross mark in the top right of the form.
If user wants to edit selected Action, click the Edit button, which will display the edit form for selected Action. After editing click the Save button to save selected Action. After saving of Action the edit form will be closed and the Action list will be set to default value.
To delete Action select it from the Action list and click Delete button.
Endpoint
To add Endpoint, click the Add button next to the Endpoint list. This will display the form for adding a new Endpoint. To add EndpointGroup assignment click the Plus button next to the label EndpointGroups. To add Condition click Plus button next to the label Condition. To add L3 Address click the Plus button next to the L3 Addresses label. After filling Endpoint attributes click Save button. After saving of Endpoint, form will be closed and the Endpoint list will be set to default value.
To view an existing Endpoint just, the Endpoint from the select box Endpoint list. The view form is read-only and can be closed by clicking cross mark in the top right of the form.
If you want to edit selected Endpoint, click the Edit button, which will display the edit form for selected Endpoint. After editing click the Save button to save selected Endpoint. After saving of Endpoint the edit form will be closed and the Endpoint list will be set to default value.
To delete Endpoint select it from the Endpoint list and click Delete button.
L3 prefix endpoint
To add L3 prefix endpoint, click the Add button next to the L3 prefix endpoint list. This will display the form for adding a new Endpoint. To add EndpointGroup assignment, click the Plus button next to the label EndpointGroups. To add Condition, click Plus button next to the label Condition. To add L2 gateway click the Plus button next to the L2 gateways label. To add L3 gateway, click the Plus button next to the L3 gateways label. After filling L3 prefix endpoint attributes click Save button. After saving of L3 prefix endpoint, form will be closed and the Endpoint list will be set to default value.
To view an existing L3 prefix endpoint, select the Endpoint from the select box L3 prefix endpoint list. The view form is read-only and can be closed by clicking cross mark in the top right of the form.
If you want to edit selected L3 prefix endpoint, click the Edit button, which will display the edit form for selected L3 prefix endpoint. After editing click the Save button to save selected L3 prefix endpoint. After saving of Endpoint the edit form will be closed and the Endpoint list will be set to default value.
To delete Endpoint select it from the L3 prefix endpoint list and click Delete button.
Wizard provides quick method to send basic data to controller necessary for basic usage of GBP application. It is useful in the case that there aren’t any data in controller. In the first tab is form for create tenant. The second tab is for CRUD operations with contracts and their sub elements such as subjects, rules, clauses, action refs and classifier refs. The last tab is for CRUD operations with EndpointGroups and their CNS and PNS. Created structure of data is possible to send by clicking on Submit button.
Please see:
It is recommended to use either:
If the REST API must be used, and the above resources are not sufficient:
http://<odl-controller>:8181/index.html
and select YangUI from the left menu.to explore the various GBP REST options
This section is for Application Developers and Network Administrators who are looking to integrate Group Based Policy with OpenStack.
To enable the GBP Neutron Mapper feature, at the Karaf console:
feature:install odl-groupbasedpolicy-neutronmapper
Neutron Mapper has the following dependencies that are automatically loaded:
odl-neutron-service
Neutron Northbound implementing REST API used by OpenStack
odl-groupbasedpolicy-base
Base GBP feature set, such as policy resolution, data model etc.
odl-groupbasedpolicy-ofoverlay
REST calls from OpenStack Neutron are by the Neutron NorthBound project.
GBP provides the implementation of the Neutron V2.0 API.
List of supported Neutron entities:
The mapping of Neutron entities to GBP entities is as follows:
Neutron Port
The Neutron port is mapped to an endpoint.
The current implementation supports one IP address per Neutron port.
An endpoint and L3-endpoint belong to multiple EndpointGroups if the Neutron port is in multiple Neutron Security Groups.
The key for endpoint is L2-bridge-domain obtained as the parent of L2-flood-domain representing Neutron network. The MAC address is from the Neutron port. An L3-endpoint is created based on L3-context (the parent of the L2-bridge-domain) and IP address of Neutron Port.
Neutron Network
A Neutron network has the following characteristics:
To represent this, a Neutron Network is mapped to multiple GBP entities. The first mapping is to an L2 flood-domain to reflect that the Neutron network is one flooding or broadcast domain. An L2-bridge-domain is then associated as the parent of L2 flood-domain. This reflects both the L2 transmission domain as well as the L2 addressing namespace.
The third mapping is to L3-context, which represents the distinct L3 address space. The L3-context is the parent of L2-bridge-domain.
Neutron Subnet
Neutron subnet is associated with a Neutron network. The Neutron subnet is mapped to a GBP subnet where the parent of the subnet is L2-flood-domain representing the Neutron network.
Neutron Security Group
GBP entity representing Neutron security-group is EndpointGroup.
Infrastructure EndpointGroups
Neutron-mapper automatically creates EndpointGroups to manage key infrastructure items such as:
Neutron Security Group Rules
This is the most involved amongst all the mappings because Neutron security-group-rules are mapped to contracts with clauses, subjects, rules, action-refs, classifier-refs, etc. Contracts are used between EndpointGroups representing Neutron Security Groups. For simplification it is important to note that Neutron security-group-rules are similar to a GBP rule containing:
Neutron Routers
Neutron router is represented as a L3-context. This treats a router as a Layer3 namespace, and hence every network attached to it a part of that Layer3 namespace.
This allows for multiple routers per tenant with complete isolation.
The mapping of the router to an endpoint represents the router’s interface or gateway port.
The mapping to an EndpointGroup represents the internal infrastructure EndpointGroups created by the GBP Neutron Mapper
When a Neutron router interface is attached to a network/subnet, that network/subnet and its associated endpoints or Neutron Ports are seamlessly added to the namespace.
Neutron FloatingIP
When associated with a Neutron Port, this leverages the OfOverlay renderer’s NAT capabilities.
A dedicated external interface on each Nova compute host allows for disitributed external access. Each Nova instance associated with a FloatingIP address can access the external network directly without having to route via the Neutron controller, or having to enable any form of Neutron distributed routing functionality.
Assuming the gateway provisioned in the Neutron Subnet command for the external network is reachable, the combination of GBP Neutron Mapper and OfOverlay renderer will automatically ARP for this default gateway, requiring no user intervention.
Troubleshooting within GBP
Logging level for the mapping functionality can be set for package org.opendaylight.groupbasedpolicy.neutron.mapper. An example of enabling TRACE logging level on Karaf console:
log:set TRACE org.opendaylight.groupbasedpolicy.neutron.mapper
Neutron mapping example
As an example for mapping can be used creation of Neutron network, subnet and port. When a Neutron network is created 3 GBP entities are created: l2-flood-domain, l2-bridge-domain, l3-context.
After an subnet is created in the network mapping looks like this.
If an Neutron port is created in the subnet an endpoint and l3-endpoint are created. The endpoint has key composed from l2-bridge-domain and MAC address from Neutron port. A key of l3-endpoint is compesed from l3-context and IP address. The network containment of endpoint and l3-endpoint points to the subnet.
No intervention passed initial OpenStack setup is required by the user.
More information about configuration can be found in our DevStack demo environment on the GBP wiki.
For consistencies sake, all provisioning should be performed via the Neutron API. (CLI or Horizon).
The mapped policies can be augmented via the GBP UX, to:
The GBP Renderer manager is an integral part of GBP base module. It dispatches information about endpoints’ policy configuration to specific device renderer by writing a renderer policy configuration into the registered renderer’s policy store.
Renderer manager is integrated into GBP base module, so no additional installation is required.
Renderer manager gets data notifications about:
Based on data from notifications it creates a configuration task for specific renderers by writing a renderer policy configuration into the registered renderer’s policy store. Configuration is stored to CONF data store as Renderers (renderer.yang).
Configuration is signed with version number which is incremented by every change. All renderers are supposed to be on the same version. Renderer manager waits for all renderers to respond with version update in OPER data store. After a version of every renderer in OPER data store has the same value as the one in CONF data store, renderer manager moves to the next configuration with incremented version.
Location manager monitors information about Endpoint Location providers (see endpoint-location-provider.yang) and manages Endpoint locations in OPER data store accordingly.
Location manager is integrated into GBP base module, so no additional installation is required.
The endpoint-locations container in OPER data store (see base-endpoint.yang) contains two lists for two types of EP location, namely address-endpoint-location and containment-endpoint-location. LocationResolver is a class that processes Location providers in CONF data store and puts location information to OPER data store.
When a new Location provider is created in CONF data store, its Address EP locations are being processed first, and their info is stored locally in accordance with processed Location provider’s priority. Then a location of type “absolute” with the highest priority is selected for an EP, and is put in OPER data store. If Address EP locations contain locations of type “relative”, those are put to OPER data store.
If current Location provider contains Containment EP locations of type “relative”, then those are put to OPER data store.
Similarly, when a Location provider is deleted, information of its locations is removed from the OPER data store.
The OpenFlow Overlay (OfOverlay) feature enables the OpenFlow Overlay renderer, which creates a network virtualization solution across nodes that host Open vSwitch software switches.
From the Karaf console in OpenDaylight:
feature:install odl-groupbasedpolicy-ofoverlay
This renderer is designed to work with OpenVSwitch (OVS) 2.1+ (although 2.3 is strongly recommended) and OpenFlow 1.3.
When used in conjunction with the Neutron Mapper feature no extra OfOverlay specific setup is required.
When this feature is loaded “standalone”, the user is required to configure infrastructure, such as
The GBP OfOverlay renderer also supports a table offset option, to offset the pipeline post-table 0. The value of table offset is stored in the config datastore and it may be rewritten at runtime.
PUT http://{{controllerIp}}:8181/restconf/config/ofoverlay:of-overlay-config
{
"of-overlay-config": {
"gbp-ofoverlay-table-offset": 6
}
}
The default value is set by changing: <gbp-ofoverlay-table-offset>0</gbp-ofoverlay-table-offset>
in file: distribution-karaf/target/assembly/etc/opendaylight/karaf/15-groupbasedpolicy-ofoverlay.xml
To avoid overwriting runtime changes, the default value is used only when the OfOverlay renderer starts and no other value has been written before.
These are the primary components of GBP. The OfOverlay components are highlighted in red.
In terms of the inner components of the GBP OfOverlay renderer:
OfOverlay Renderer
Launches components below:
Policy Resolver
Policy resolution is completely domain independent, and the OfOverlay leverages process policy information internally. See Policy Resolution process.
It listens to inputs to the Tenants configuration datastore, validates tenant input, then writes this to the Tenants operational datastore.
From there an internal notification is generated to the PolicyManager.
In the next release, this will be moving to a non-renderer specific location.
Endpoint Manager
The endpoint repository operates in orchestrated mode. This means the user is responsible for the provisioning of endpoints via:
Note
When using the Neutron mapper feature, everything is managed transparently via Neutron.
The Endpoint Manager is responsible for listening to Endpoint repository updates and notifying the Switch Manager when a valid Endpoint has been registered.
It also supplies utility functions to the flow pipeline process.
Switch Manager
The Switch Manager is purely a state manager.
Switches are in one of 3 states:
Ready is denoted by a connected switch:
In this way GBP is not writing to switches it has no business to.
Preparing simply means the switch has a controller connection but is missing one of the above complete and necessary conditions
Disconnected means a previously connected switch is no longer present in the Inventory operational datastore.
The OfOverlay leverages Nicira registers as follows:
Port Security
Table 0 of the OpenFlow pipeline. Responsible for ensuring that only valid connections can send packets into the pipeline:
cookie=0x0, <snip> , priority=200,in_port=3 actions=goto_table:2
cookie=0x0, <snip> , priority=200,in_port=1 actions=goto_table:1
cookie=0x0, <snip> , priority=121,arp,in_port=5,dl_src=fa:16:3e:d5:b9:8d,arp_spa=10.1.1.3 actions=goto_table:2
cookie=0x0, <snip> , priority=120,ip,in_port=5,dl_src=fa:16:3e:d5:b9:8d,nw_src=10.1.1.3 actions=goto_table:2
cookie=0x0, <snip> , priority=115,ip,in_port=5,dl_src=fa:16:3e:d5:b9:8d,nw_dst=255.255.255.255 actions=goto_table:2
cookie=0x0, <snip> , priority=112,ipv6 actions=drop
cookie=0x0, <snip> , priority=111, ip actions=drop
cookie=0x0, <snip> , priority=110,arp actions=drop
cookie=0x0, <snip> ,in_port=5,dl_src=fa:16:3e:d5:b9:8d actions=goto_table:2
cookie=0x0, <snip> , priority=1 actions=drop
Ingress from tunnel interface, go to Table Source Mapper:
cookie=0x0, <snip> , priority=200,in_port=3 actions=goto_table:2
Ingress from outside, goto Table Ingress NAT Mapper:
cookie=0x0, <snip> , priority=200,in_port=1 actions=goto_table:1
ARP from Endpoint, go to Table Source Mapper:
cookie=0x0, <snip> , priority=121,arp,in_port=5,dl_src=fa:16:3e:d5:b9:8d,arp_spa=10.1.1.3 actions=goto_table:2
IPv4 from Endpoint, go to Table Source Mapper:
cookie=0x0, <snip> , priority=120,ip,in_port=5,dl_src=fa:16:3e:d5:b9:8d,nw_src=10.1.1.3 actions=goto_table:2
DHCP DORA from Endpoint, go to Table Source Mapper:
cookie=0x0, <snip> , priority=115,ip,in_port=5,dl_src=fa:16:3e:d5:b9:8d,nw_dst=255.255.255.255 actions=goto_table:2
Series of DROP tables with priority set to capture any non-specific traffic that should have matched above:
cookie=0x0, <snip> , priority=112,ipv6 actions=drop
cookie=0x0, <snip> , priority=111, ip actions=drop
cookie=0x0, <snip> , priority=110,arp actions=drop
“L2” catch all traffic not identified above:
cookie=0x0, <snip> ,in_port=5,dl_src=fa:16:3e:d5:b9:8d actions=goto_table:2
Drop Flow:
cookie=0x0, <snip> , priority=1 actions=drop
Ingress NAT Mapper
Table offset +1.
ARP responder for external NAT address:
cookie=0x0, <snip> , priority=150,arp,arp_tpa=192.168.111.51,arp_op=1 actions=move:NXM_OF_ETH_SRC[]->NXM_OF_ETH_DST[],set_field:fa:16:3e:58:c3:dd->eth_src,load:0x2->NXM_OF_ARP_OP[],move:NXM_NX_ARP_SHA[]->NXM_NX_ARP_THA[],load:0xfa163e58c3dd->NXM_NX_ARP_SHA[],move:NXM_OF_ARP_SPA[]->NXM_OF_ARP_TPA[],load:0xc0a86f33->NXM_OF_ARP_SPA[],IN_PORT
Translate from Outside to Inside and perform same functions as SourceMapper.
cookie=0x0, <snip> , priority=100,ip,nw_dst=192.168.111.51 actions=set_field:10.1.1.2->ip_dst,set_field:fa:16:3e:58:c3:dd->eth_dst,load:0x2->NXM_NX_REG0[],load:0x1->NXM_NX_REG1[],load:0x4->NXM_NX_REG4[],load:0x5->NXM_NX_REG5[],load:0x7->NXM_NX_REG6[],load:0x3->NXM_NX_TUN_ID[0..31],goto_table:3
Source Mapper
Table offset +2.
Determines based on characteristics from the ingress port, which:
Establishes tunnels at valid destination switches for ingress.
Ingress Tunnel established at remote node with VNID Ordinal that maps to Source EPG, Forwarding Context etc:
cookie=0x0, <snip>, priority=150,tun_id=0xd,in_port=3 actions=load:0xc->NXM_NX_REG0[],load:0xffffff->NXM_NX_REG1[],load:0x4->NXM_NX_REG4[],load:0x5->NXM_NX_REG5[],load:0x7->NXM_NX_REG6[],goto_table:3
Maps endpoint to Source EPG, Forwarding Context based on ingress port, and MAC:
cookie=0x0, <snip> , priority=100,in_port=5,dl_src=fa:16:3e:b4:b4:b1 actions=load:0xc->NXM_NX_REG0[],load:0x1->NXM_NX_REG1[],load:0x4->NXM_NX_REG4[],load:0x5->NXM_NX_REG5[],load:0x7->NXM_NX_REG6[],load:0xd->NXM_NX_TUN_ID[0..31],goto_table:3
Generic drop:
cookie=0x0, duration=197.622s, table=2, n_packets=0, n_bytes=0, priority=1 actions=drop
Destination Mapper
Table offset +3.
Determines based on characteristics of the endpoint:
Manages routing based on valid ingress nodes ARP’ing for their default gateway, and matches on either gateway MAC or destination endpoint MAC.
ARP for default gateway for the 10.1.1.0/24 subnet:
cookie=0x0, <snip> , priority=150,arp,reg6=0x7,arp_tpa=10.1.1.1,arp_op=1 actions=move:NXM_OF_ETH_SRC[]->NXM_OF_ETH_DST[],set_field:fa:16:3e:28:4c:82->eth_src,load:0x2->NXM_OF_ARP_OP[],move:NXM_NX_ARP_SHA[]->NXM_NX_ARP_THA[],load:0xfa163e284c82->NXM_NX_ARP_SHA[],move:NXM_OF_ARP_SPA[]->NXM_OF_ARP_TPA[],load:0xa010101->NXM_OF_ARP_SPA[],IN_PORT
Broadcast traffic destined for GroupTable:
cookie=0x0, <snip> , priority=140,reg5=0x5,dl_dst=01:00:00:00:00:00/01:00:00:00:00:00 actions=load:0x5->NXM_NX_TUN_ID[0..31],group:5
Layer3 destination matching flows, where priority=100+masklength. Since GBP now support L3Prefix endpoint, we can set default routes etc:
cookie=0x0, <snip>, priority=132,ip,reg6=0x7,dl_dst=fa:16:3e:b4:b4:b1,nw_dst=10.1.1.3 actions=load:0xc->NXM_NX_REG2[],load:0x1->NXM_NX_REG3[],load:0x5->NXM_NX_REG7[],set_field:fa:16:3e:b4:b4:b1->eth_dst,dec_ttl,goto_table:4
Layer2 destination matching flows, designed to be caught only after last IP flow (lowest priority IP flow is 100):
cookie=0x0, duration=323.203s, table=3, n_packets=4, n_bytes=168, priority=50,reg4=0x4,dl_dst=fa:16:3e:58:c3:dd actions=load:0x2->NXM_NX_REG2[],load:0x1->NXM_NX_REG3[],load:0x2->NXM_NX_REG7[],goto_table:4
General drop flow: cookie=0x0, duration=323.207s, table=3, n_packets=6, n_bytes=588, priority=1 actions=drop
Policy Enforcer
Table offset +4.
Once the Source and Destination EndpointGroups are assigned, policy is enforced based on resolved rules.
In the case of Service Function Chaining, the encapsulation and destination for traffic destined to a chain, is discovered and enforced.
Policy flow, allowing IP traffic between EndpointGroups:
cookie=0x0, <snip> , priority=64998,ip,reg0=0x8,reg1=0x1,reg2=0xc,reg3=0x1 actions=goto_table:5
Egress NAT Mapper
Table offset +5.
Performs NAT function before Egressing OVS instance to the underlay network.
Inside to Outside NAT translation before sending to underlay:
cookie=0x0, <snip> , priority=100,ip,reg6=0x7,nw_src=10.1.1.2 actions=set_field:192.168.111.51->ip_src,goto_table:6
External Mapper
Table offset +6.
Manages post-policy enforcement for endpoint specific destination effects. Specifically for Service Function Chaining, which is why we can support both symmetric and asymmetric chains and distributed ingress/egress classification.
Generic allow:
cookie=0x0, <snip>, priority=100 actions=output:NXM_NX_REG7[]
Note
Please see the UX section on how to configure GBP via the GUI.
Endpoint
POST http://{{controllerIp}}:8181/restconf/operations/endpoint:register-endpoint
{
"input": {
"endpoint-group": "<epg0>",
"endpoint-groups" : ["<epg1>","<epg2>"],
"network-containment" : "<fowarding-model-context1>",
"l2-context": "<bridge-domain1>",
"mac-address": "<mac1>",
"l3-address": [
{
"ip-address": "<ipaddress1>",
"l3-context": "<l3_context1>"
}
],
"*ofoverlay:port-name*": "<ovs port name>",
"tenant": "<tenant1>"
}
}
Note
The usage of “port-name” preceded by “ofoverlay”. In OpenDaylight, base datastore objects can be augmented. In GBP, the base endpoint model has no renderer specifics, hence can be leveraged across multiple renderers.
OVS Augmentations to Inventory
PUT http://{{controllerIp}}:8181/restconf/config/opendaylight-inventory:nodes/
{
"opendaylight-inventory:nodes": {
"node": [
{
"id": "openflow:123456",
"ofoverlay:tunnel": [
{
"tunnel-type": "overlay:tunnel-type-vxlan",
"ip": "<ip_address_of_ovs>",
"port": 4789,
"node-connector-id": "openflow:123456:1"
}
]
},
{
"id": "openflow:654321",
"ofoverlay:tunnel": [
{
"tunnel-type": "overlay:tunnel-type-vxlan",
"ip": "<ip_address_of_ovs>",
"port": 4789,
"node-connector-id": "openflow:654321:1"
}
]
}
]
}
}
Tenants see Policy Resolution and Forwarding Model for details:
{
"policy:tenant": {
"contract": [
{
"clause": [
{
"name": "allow-http-clause",
"subject-refs": [
"allow-http-subject",
"allow-icmp-subject"
]
}
],
"id": "<id>",
"subject": [
{
"name": "allow-http-subject",
"rule": [
{
"classifier-ref": [
{
"direction": "in",
"name": "http-dest"
},
{
"direction": "out",
"name": "http-src"
}
],
"action-ref": [
{
"name": "allow1",
"order": 0
}
],
"name": "allow-http-rule"
}
]
},
{
"name": "allow-icmp-subject",
"rule": [
{
"classifier-ref": [
{
"name": "icmp"
}
],
"action-ref": [
{
"name": "allow1",
"order": 0
}
],
"name": "allow-icmp-rule"
}
]
}
]
}
],
"endpoint-group": [
{
"consumer-named-selector": [
{
"contract": [
"<id>"
],
"name": "<name>"
}
],
"id": "<id>",
"provider-named-selector": []
},
{
"consumer-named-selector": [],
"id": "<id>",
"provider-named-selector": [
{
"contract": [
"<id>"
],
"name": "<name>"
}
]
}
],
"id": "<id>",
"l2-bridge-domain": [
{
"id": "<id>",
"parent": "<id>"
}
],
"l2-flood-domain": [
{
"id": "<id>",
"parent": "<id>"
},
{
"id": "<id>",
"parent": "<id>"
}
],
"l3-context": [
{
"id": "<id>"
}
],
"name": "GBPPOC",
"subject-feature-instances": {
"classifier-instance": [
{
"classifier-definition-id": "<id>",
"name": "http-dest",
"parameter-value": [
{
"int-value": "6",
"name": "proto"
},
{
"int-value": "80",
"name": "destport"
}
]
},
{
"classifier-definition-id": "<id>",
"name": "http-src",
"parameter-value": [
{
"int-value": "6",
"name": "proto"
},
{
"int-value": "80",
"name": "sourceport"
}
]
},
{
"classifier-definition-id": "<id>",
"name": "icmp",
"parameter-value": [
{
"int-value": "1",
"name": "proto"
}
]
}
],
"action-instance": [
{
"name": "allow1",
"action-definition-id": "<id>"
}
]
},
"subnet": [
{
"id": "<id>",
"ip-prefix": "<ip_prefix>",
"parent": "<id>",
"virtual-router-ip": "<ip address>"
},
{
"id": "<id>",
"ip-prefix": "<ip prefix>",
"parent": "<id>",
"virtual-router-ip": "<ip address>"
}
]
}
}
The IO Visor renderer feature enables container endpoints (e.g. Docker, LXC) to leverage GBP policies.
The renderer interacts with a IO Visor module from the Linux Foundation IO Visor project.
From the Karaf console in OpenDaylight:
feature:install odl-groupbasedpolicy-iovisor odl-restconf
Installation details, usage, and other information for the IO Visor GBP module can be found here: IO Visor github repo for IO Modules
The FaaS renderer feature enables leveraging the FaaS project as a GBP renderer.
From the Karaf console in OpenDaylight:
feature:install odl-groupbasedpolicy-faas
More information about FaaS can be found here: https://wiki.opendaylight.org/view/FaaS:GBPIntegration
Please refer to the Service Function Chaining project for specifics on SFC provisioning and theory.
GBP allows for the use of a chain, by name, in policy.
This takes the form of an action in GBP.
Using the GBP demo and development environment as an example:
In the topology above, a symmetrical chain between H35_2 and H36_3 could take path:
H35_2 to sw1 to sff1 to sf1 to sff1 to sff2 to sf2 to sff2 to sw6 to H36_3
If symmetric chaining was desired, the return path is:
If asymmetric chaining was desired, the return path could be direct, or an entirely different chain.
All these scenarios are supported by the integration.
In the Subject Feature Instance section of the tenant config, we define the instances of the classifier definitions for ICMP and HTTP:
"subject-feature-instances": {
"classifier-instance": [
{
"name": "icmp",
"parameter-value": [
{
"name": "proto",
"int-value": 1
}
]
},
{
"name": "http-dest",
"parameter-value": [
{
"int-value": "6",
"name": "proto"
},
{
"int-value": "80",
"name": "destport"
}
]
},
{
"name": "http-src",
"parameter-value": [
{
"int-value": "6",
"name": "proto"
},
{
"int-value": "80",
"name": "sourceport"
}
]
}
],
Then the action instances to associate to traffic that matches classifiers are defined.
Note the SFC chain name must exist in SFC, and is validated against the datastore once the tenant configuration is entered, before entering a valid tenant configuration into the operational datastore (which triggers policy resolution).
"action-instance": [
{
"name": "chain1",
"parameter-value": [
{
"name": "sfc-chain-name",
"string-value": "SFCGBP"
}
]
},
{
"name": "allow1",
}
]
},
When ICMP is matched, allow the traffic:
"contract": [
{
"subject": [
{
"name": "icmp-subject",
"rule": [
{
"name": "allow-icmp-rule",
"order" : 0,
"classifier-ref": [
{
"name": "icmp"
}
],
"action-ref": [
{
"name": "allow1",
"order": 0
}
]
}
]
},
When HTTP is matched, in to the provider of the contract with a TCP destination port of 80 (HTTP) or the HTTP request. The chain action is triggered, and similarly out from the provider for traffic with TCP source port of 80 (HTTP), or the HTTP response.
{
"name": "http-subject",
"rule": [
{
"name": "http-chain-rule-in",
"classifier-ref": [
{
"name": "http-dest",
"direction": "in"
}
],
"action-ref": [
{
"name": "chain1",
"order": 0
}
]
},
{
"name": "http-chain-rule-out",
"classifier-ref": [
{
"name": "http-src",
"direction": "out"
}
],
"action-ref": [
{
"name": "chain1",
"order": 0
}
]
}
]
}
To enable asymmetrical chaining, for instance, the user desires that HTTP requests traverse the chain, but the HTTP response does not, the HTTP response is set to allow instead of chain:
{
"name": "http-chain-rule-out",
"classifier-ref": [
{
"name": "http-src",
"direction": "out"
}
],
"action-ref": [
{
"name": "allow1",
"order": 0
}
]
}
The GBP project for this release has two demo/development environments.