OpenStack with Virtual Tenant Network

This section describes using OpenDaylight with the VTN manager feature providing network service for OpenStack. VTN manager utilizes the OVSDB southbound service and Neutron for this implementation. The below diagram depicts the communication of OpenDaylight and two virtual networks connected by an OpenFlow switch using this implementation.

../_images/OpenStackDeveloperGuide.png

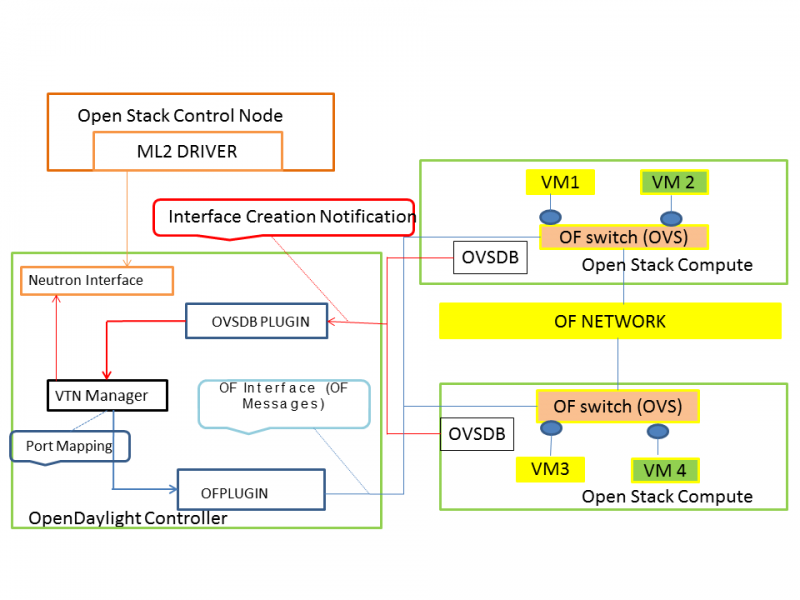
OpenStack Architecture

Configure OpenStack to work with OpenDaylight(VTN Feature) using PackStack

Prerequisites to install OpenStack using PackStack

  • Fresh CentOS 7.1 minimal install
  • Use the below commands to disable and remove Network Manager in CentOS 7.1,
systemctl stop NetworkManager
systemctl disable NetworkManager
  • To make SELINUX as permissive, please open the file “/etc/sysconfig/selinux” and change it as “SELINUX=permissive”.
  • After making selinux as permissive, please restart the CentOS 7.1 machine.

Steps to install OpenStack PackStack in CentOS 7.1

  • To install OpenStack juno, use the following command,
yum update -y
yum -y install https://repos.fedorapeople.org/repos/openstack/openstack-juno/rdo-release-juno-1.noarch.rpm
  • To install the packstack installer, please use the below command,
yum -y install openstack-packstack
  • To create all-in-one setup, please use the below command,
packstack --allinone --provision-demo=n --provision-all-in-one-ovs-bridge=n
  • This will end up with Horizon started successfully message.

Steps to install and deploy OpenDaylight in CentOS 7.1

  • Download the latest Boron distribution code in the below link,
wget https://nexus.opendaylight.org/content/groups/public/org/opendaylight/integration/distribution-karaf/0.5.0-Boron/distribution-karaf-0.5.0-Boron.zip
  • Unzip the Boron distribution code by using the below command,
unzip distribution-karaf-0.5.0-Boron.zip
  • Please do the below steps in the OpenDaylight to change jetty port,
    • Change the jetty port from 8080 to something else as swift proxy of OpenStack is using it.
    • Open the file “etc/jetty.xml” and change the jetty port from 8080 to 8910 (we have used 8910 as jetty port you can use any other number).
    • Start VTN Manager and install odl-vtn-manager-neutron in it.
    • Ensure all the required ports(6633/6653,6640 and 8910) are in the listen mode by using the command “netstat -tunpl” in OpenDaylight.

Steps to reconfigure OpenStack in CentOS 7.1

  • Steps to stop Open vSwitch Agent and clean up ovs
sudo systemctl stop neutron-openvswitch-agent
sudo systemctl disable neutron-openvswitch-agent
sudo systemctl stop openvswitch
sudo rm -rf /var/log/openvswitch/*
sudo rm -rf /etc/openvswitch/conf.db
sudo systemctl start openvswitch
sudo ovs-vsctl show
  • Stop Neutron Server
systemctl stop neutron-server
  • Verify that OpenDaylight’s ML2 interface is working:
curl -v admin:admin http://{CONTROL_HOST}:{PORT}/controller/nb/v2/neutron/networks

{
   "networks" : [ ]
}

If this does not work or gives an error, check Neutron’s log file in /var/log/neutron/server.log. Error messages here should give some clue as to what the problem is in the connection with OpenDaylight

  • Configure Neutron to use OpenDaylight’s ML2 driver:
sudo crudini --set /etc/neutron/plugins/ml2/ml2_conf.ini ml2 mechanism_drivers opendaylight
sudo crudini --set /etc/neutron/plugins/ml2/ml2_conf.ini ml2 tenant_network_types local
sudo crudini --set /etc/neutron/plugins/ml2/ml2_conf.ini ml2 type_drivers local
sudo crudini --set /etc/neutron/dhcp_agent.ini DEFAULT ovs_use_veth True

cat <<EOT | sudo tee -a /etc/neutron/plugins/ml2/ml2_conf.ini > /dev/null
  [ml2_odl]
  password = admin
  username = admin
  url = http://{CONTROL_HOST}:{PORT}/controller/nb/v2/neutron
  EOT
  • Reset Neutron’s ML2 database
sudo mysql -e "drop database if exists neutron_ml2;"
sudo mysql -e "create database neutron_ml2 character set utf8;"
sudo mysql -e "grant all on neutron_ml2.* to 'neutron'@'%';"
sudo neutron-db-manage --config-file /usr/share/neutron/neutron-dist.conf --config-file /etc/neutron/neutron.conf --config-file /etc/neutron/plugin.ini upgrade head
  • Start Neutron Server
sudo systemctl start neutron-server
  • Restart the Neutron DHCP service
system restart neutron-dhcp-agent.service
  • At this stage, your Open vSwitch configuration should be empty:
[root@dneary-odl-compute2 ~]# ovs-vsctl show
686989e8-7113-4991-a066-1431e7277e1f
    ovs_version: "2.3.1"
  • Set OpenDaylight as the manager on all nodes
ovs-vsctl set-manager  tcp:127.0.0.1:6640
  • You should now see a section in your Open vSwitch configuration showing that you are connected to the OpenDaylight server, and OpenDaylight will automatically create a br-int bridge:
[root@dneary-odl-compute2 ~]# ovs-vsctl show
686989e8-7113-4991-a066-1431e7277e1f
    Manager "tcp:127.0.0.1:6640"
        is_connected: true
    Bridge br-int
        Controller "tcp:127.0.0.1:6633"
            is_connected: true
        fail_mode: secure
        Port "ens33"
            Interface "ens33"
    ovs_version: "2.3.1"
  • Add the default flow to OVS to forward packets to controller when there is a table-miss,
ovs-ofctl --protocols=OpenFlow13 add-flow br-int priority=0,actions=output:CONTROLLER

Implementation details

VTN Manager

Install odl-vtn-manager-neutron feature which provides the integration with Neutron interface.

feature:install odl-vtn-manager-neutron

It subscribes to the events from Open vSwitch and also implements the Neutron requests received by OpenDaylight.

Functional Behavior

StartUp

  • The ML2 implementation for OpenDaylight will ensure that when Open vSwitch is started, the ODL_IP_ADDRESS configured will be set as manager.
  • When OpenDaylight receives the update of the Open vSwitch on port 6640 (manager port), VTN Manager handles the event and adds a bridge with required port mappings to the Open vSwitch at the OpenStack node.
  • When Neutron starts up, a new network create is POSTed to OpenDaylight, for which VTN Manager creates a Virtual Tenant Network.
  • Network and Sub-Network Create: Whenever a new sub network is created, VTN Manager will handle the same and create a vbridge under the VTN.
  • VM Creation in OpenStack: The interface mentioned as integration bridge in the configuration file will be added with more interfaces on creation of a new VM in OpenStack and the network is provisioned for it by the VTN Neutron feature. The addition of a new port is captured by the VTN Manager and it creates a vbridge interface with port mapping for the particular port. When the VM starts to communicate with other VMs, the VTN Manger will install flows in the Open vSwitch and other OpenFlow switches to facilitate communication between them.

Note

To use this feature, VTN feature should be installed