

Main Logic
Taking into consideration that some of the underlay nodes may not transform into overlay nodes (e.g. they are filtered out), we created two possible states for links:
- matched - a link is considered as matched when both original source and destination node were transformed to overlay nodes
- waiting - a link is considered as waiting if original source, destination or both nodes are missing from the overlay topology
All links in waiting the state are stored in waitingLinks list, already matched links are stored in matchedLinks list and overlay nodes are stored in the storedOverlayNodes list. All processing is based only on information in these lists. Processing created, updated and removed underlay items is slightly different and described in next sections separately.
Processing Created Items
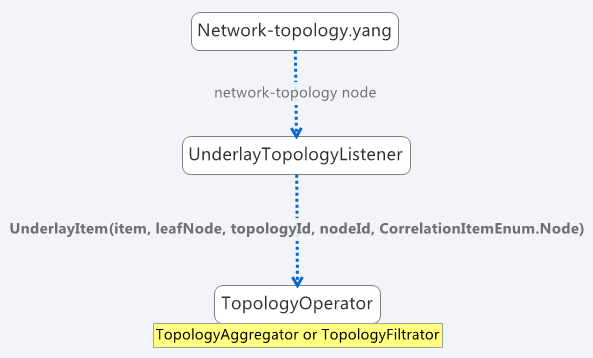
Created items can be either nodes or links, depending on the type of listener from which they came. In the case of a link, it is immediately added to waitingLinks and calculation for possible overlay link creations (calculatePossibleLink) is started. The flow diagram for this process is shown in the following picture:

Flow diagram of processing created items
Searching for the source and destination nodes in the calculatePossibleLink method runs over each node in storedOverlayNodes and the IDs of each supporting node is compared against IDs from the underlay link’s source and destination nodes. If there are any nodes missing, the link remains in the waiting state. If both the source and destination nodes are found, the corresponding overlay nodes is recorded as the new source and destination. The link is then removed from waitingLinks and a new CalculatedLink is added to the matched links. At the end, the new link (if it exists) is written into the datastore.
If the created item is an overlayNode, this is added to storedOverlayNodes and we call calculatePossibleLink for every link in waitingLinks.
Processing Updated Items
The difference from processing created items is that we have three possible types of updated items: overlay nodes, waiting underlay links, and matched underlay links.
- In the case of a change in a matched link, this must be recalculated and based on the result it will either be matched with new source and destination or will be returned to waiting links. If the link is moved back to a waiting state, it must also be removed from the datastore.
- In the case of change in a waiting link, it is passed to the calculation process and based on the result will either remain in waiting state or be promoted to the matched state.
- In the case of a change in an overlay node, storedOverlayNodes must be updated properly and all links must be recalculated in case of changes.
Processing Removed items
Same as for processing updated item. There can be three types of removed items:
- In case of waiting link removal, the link is just removed from waitingLinks
- In case of matched link removal, the link is removed from matchingLinks and datastore
- In case of overlay node removal, the node must be removed form storedOverlayNodes and all matching links must be recalculated